The counterbalancing weight of a garage door is entirely dependent on its springs, which makes it a critical component. It is segregated into two main categories, including torsion and extension, contributing to the smooth and controlled movement of the door.
The springs are installed to complete 10,000 cycles, so the wear and tear depends on the usage of the garage door. However, research shows that springs can last up to 7-10 years. The wearing out of springs leads to multiple issues, including imbalances, weird noise, difficulty in opening and closing, etc.
Timely maintenance can reduce the probability of replacement of springs, but if it is required, then it should be done by an experienced professional. This blog will provide in-depth knowledge related to the mechanics of garage door spring repair and replacement of garage door springs.
Removing the Garage Door Old Springs
It is recommended to hire a professional for the garage door spring repair and replacement of garage doors as they are experienced and have the right tools to replace springs. However, if you deem it suitable, then you can follow the steps described below to remove the old springs:
Step 1: Disconnect the Power Supply and Clamp the Garage Door
The first step is to disconnect the power supply by removing the opener. As safety comes first, this will make the garage door remain closed throughout the time of removal and replacement.
Afterwards, in order to secure the door to the track so that it doesn’t open when you release the tension on the springs, use a C-clam or locking pliers.
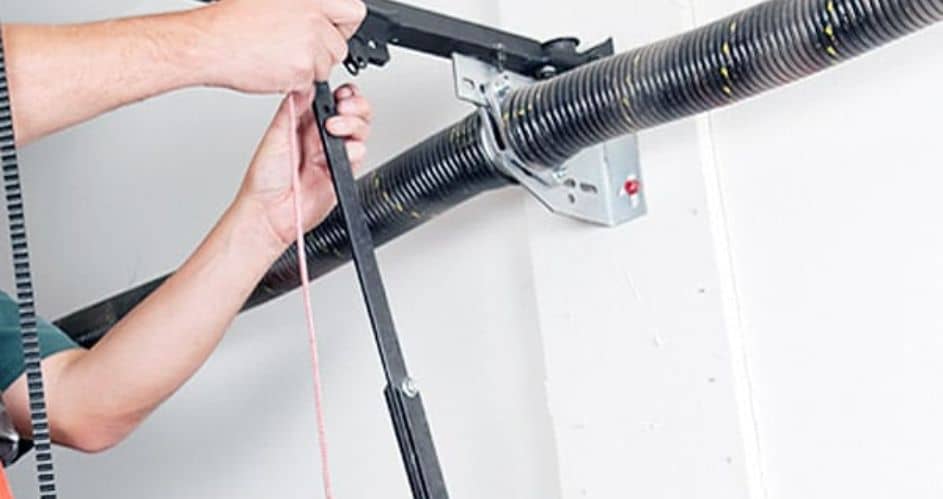
Step 2: Loosen the Set Screws
The next step is to loosen the screws while holding it with a winding bar. For this, take preventive measures by standing on the side of the spring instead of the front and using gloves and glasses for eye protection.
To loosen the 2 set screws, use a wrench while simultaneously using a winding bar by pushing it into the bottom hole of the winding cone on the outside. The bar should be handled with a firm grip, as the spring will expand once the screws are released.
This whole procedure should be repeated on the other side as well. If you are unsure you can take up garage door spring repair service.
Step 3: Unwind each Spring
Now, each spring needs to unwind using 2 winding bars. Make sure to use both winding bars perpendicularly to each other.
Then, one must unwind the spring to ¼ turn at a time and then move the winding bar by placing it again in the next open perpendicular position. Repeat this whole process of garage door spring repair till the whole spring is unwind.
Step 4: Remove Nuts and Bolts
The essential point is to use the right tool at the right time. At this point, the nuts and bolts need to be removed so that the spring can be moved at the end. With the help of a wrench, each spring can be moved to the end of the bracket.
Step 5: Securing of the Torsion Tube
First of all secure the torsion tube to the center bracket by locking pliers or c-clamps, whatever is being used. It will reduce the chances of potential injuries. Loosen up the screws on both lift drums to disconnect the lift cables.
It will help to remove the cable drums and springs from the torsion tube effortlessly.
Step 6: Measure the length of the Relaxed Spring in Inches
At this point, while taking care of the garage door spring repair, Garage Door Pros recommends measuring the length of the spring now, as it is relaxed. If it is measured earlier, the tension on the spring while installed may lead to incorrect measurements.
Record this information in inches to order the replacement of springs. Along with length, the measurement of the inside diameter is also required as the wrong size of the coil could be a contributing factor to the issues of garage doors.
Step 7: Replacement Springs
Although the replacement springs are not directly sold to customers, they are available online. The best recommended option is to purchase double life-springs as they are stronger and last long.
Lastly, it is the best time to inspect the whole door because the tension is released to see if there are any other rusted components or not.
Installing the Garage Door New Spring
Once the removal phase is completed and new springs arrive, then it’s the best time to install them as a priority by following the below steps:
The first thing is to place the new left spring on the torsion tube. While doing this, make sure to place it in a way that the stationary cone on the end faces the center bracket. Then, insert the torsion bar into the left bearing bracket after replacing the cable.
After installing the left spring, the center bearing should be added by sliding the torsion bar to the left. Now, connect both stationary cones to the center brackets with the nuts and bolts removed previously. At this point, there is no need to hold the spring with pliers, so remove them from the center bracket.
The same amount of tension is required on both sides for the doors to move smoothly. For this, run the lift cable between the roller and slip it through the cable slot on the drum.
Secure it in place with the help of locking pliers on the torsion tube. Spin the drum to wind the cable and then tighten the screws. The whole process should be repeated on the other side as well.
The next step of garage door spring repair is to wind the springs by inserting two winding bars into winding cones in a similar manner; they were unwinding earlier.
The number of turns should be confirmed by the suppliers of springs to lock appropriate amounts of tension. The over-winding of the spring may tighten it more, which will result in breakage and injuries.
Now tighten the set screws by using your fingers until it contacts the torsion tube. Furthermore, lubricate the springs by spraying lubricant carefully. Since the springs are intact now, this is the right time to remove the pliers being placed earlier to hold both the torsion bar and garbage door.
The last step is to check by lifting the door to 3 feet high and letting it go. If it stays in place, then you are good to go; otherwise, add a ¼ turn to each spring and test it again. Lastly, plug the garbage door opener to operate it.
Conclusion:
In a nutshell, the timely maintenance of garage door spring repair is paramount to the safety and functionality of the door. Even though there might not be any issue, such components have a lifespan, and after that, they start deteriorating.
By recognizing the signs of spring damage and addressing them promptly, you will be able to not only ensure the extension of the lifespan of your garage door but also ensure the security and convenience of your home.