We all love the comfort and cool relief that air conditioning provides, especially during the scorching summer months. However, even the most reliable air conditioning units can encounter problems from time to time.
Don’t fret! In this guide, we will unravel the mysteries behind common air conditioning problems and equip you with the knowledge to troubleshoot them like a pro.
Remember, knowledge about common air conditioner problems and troubleshooting methods saves you money and allows you to enjoy uninterrupted comfort in your living space.
So, let’s dive in and uncover the secrets to maintaining a cool and hassle-free indoor environment. Say goodbye to sweltering heat and too-cold air and hello to a well-functioning air conditioning system!
Aircon Problems and How to fix them
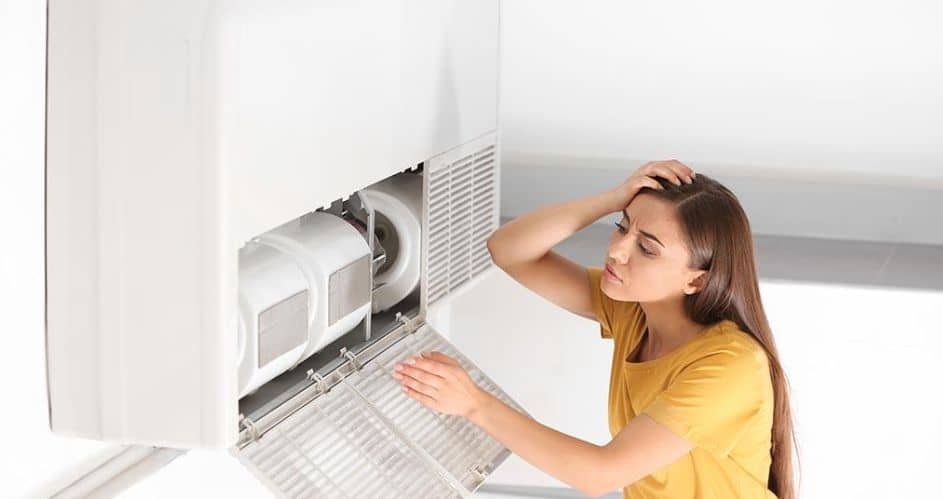
Dirty Air Filters
Air filters play a crucial role in maintaining the air quality and efficiency of your ac unit. Over time, these filters can become clogged with dirt, dust, pet hair, and other debris.
When air filters become dirty, they restrict the airflow, making it harder for the unit to circulate and blow cool air effectively. This can lead to reduced cooling performance, increased energy consumption, allergic respiratory diseases, and even potential damage to the system.
Causes of Dirty Air Filters:
- Several factors contribute to the accumulation of dirt and debris on air filters. These include:
- Regular use of the air conditioners
- Environmental factors such as dust, pollen, and pet dander
- Poor indoor air quality
- Neglecting regular maintenance and filter cleaning or replacement
Symptoms:
Recognising the signs of dirty filters is crucial in maintaining the optimal performance of your air conditioner’s part. Look out for the following symptoms:
- Reduced or not blowing cold air from the vents
- Longer cooling cycles
- Inadequate cooling or difficulty reaching the desired temperature
- Increased energy consumption
- Dusty or dirty air around the vents
Troubleshooting Steps:
Turn off the air conditioner:
Before performing any maintenance on your air conditioning unit, ensure it is powered off. This step is crucial for safety reasons.
Locate and remove the air filters:
Air filters are typically behind the air conditioning unit’s front panel, grille, or access panel. Refer to your unit’s manual to find the exact location and method of removal.
Inspect the filters for dirt and debris:
Look closely at the air filters and check for dirt, dust, or any visible debris; if the filters are heavily clogged or damaged, replacing them rather than cleaning them is recommended.
Clean or replace the dirty air filter:
If they are lightly soiled, use a vacuum cleaner or gently wash them with mild soap and water. Ensure the filters are completely dry before reinstalling. Replacing heavily soiled, damaged or clogged air filters with new ones is best.
Reinstall the filters:
Carefully insert the clean or new filters into their designated slots. Ensure they are correctly aligned and securely placed.
Turn on the air conditioner:
After reinstalling the filters, power the air conditioning unit and observe the airflow. You should notice improved airflow and enhanced cooling performance.
Regularly cleaning or replacing your air conditioner’s filters every 1 to 3 months (depending on usage and manufacturer’s recommendations) is essential to maintain the efficiency and longevity of your air conditioning system.
Insufficient Cooling or Blowing Warm Air
One of the most frustrating issues with air conditioning units is when they fail to provide sufficient cooling or start blowing warm air instead. This problem can make your indoor environment uncomfortable and defeat the purpose of having an air conditioner.
Understanding the causes and troubleshooting methods for insufficient cooling or warm air is essential in restoring the proper functionality of your unit.
Causes of Insufficient Cooling or Warm Air:
Several factors can contribute to this problem, including:
- Incorrect thermostat settings
- Air conditioner not set to “Cool” mode
- Inadequate temperature setting on the thermostat
- Blockages or obstructions in the air vents
- Dirty or clogged air vents
- Frozen evaporator coil due to restricted airflow or refrigerant issues
Symptoms:
Recognising the symptoms of insufficient cooling or warm air from your air conditioning unit can help you promptly identify and troubleshoot the problem. Look out for the following signs for most air conditioning systems:
- Inability to reach the desired temperature
- Airflow feels weak or insufficient
- Warm or hot air blowing from the vents
- Uneven cooling throughout the space
- Increased humidity levels indoors
Troubleshooting Steps:
Check the thermostat settings:
Ensure that the thermostat is set to the desired temperature and mode of operation. Verify that it is correctly programmed for cooling and that the temperature setting is lower than the current room temperature.
Ensure the air conditioner is set to “Cool” mode:
Double-check that your air conditioner is set to the “Cool” mode instead of the “Fan” or “Heat” mode. Adjust the settings accordingly.
Verify that the temperature setting is lower than the room temperature:
Make sure that the temperature setting on the thermostat is lower than the current room temperature. If it is set too close to the current temperature, the air conditioner may not kick in.
Examine the air vents for blockages or obstructions:
Inspect the air vents inside and outside the house. Look for blockages or obstructions, such as furniture, curtains, or debris that may hinder the airflow.
Clean the air vents and remove any obstacles:
Clean the air vents using a soft brush or a vacuum cleaner to remove dust, dirt, or any other debris that may impede the airflow. Also, ensure that there are no obstructions in front of the vents.
Check for a frozen evaporator coil:
If none of the previous steps resolves the issue, there might be a frozen evaporator coil. Turn off the air conditioner and allow the unit to defrost completely. This may take several hours. Once defrosted, restart the air conditioner and monitor its performance.
Allow the unit to defrost and then restart it:
If the evaporator coil is frozen, it indicates an underlying problem, such as restricted airflow or refrigerant issues. Contact a professional HVAC technician to diagnose and address the root cause.
Suppose the problem persists or you cannot identify the root cause. In that case, it is recommended to seek the assistance of a qualified HVAC technician to ensure a proper diagnosis and resolution of the issue.
Refrigerant Leak
A refrigerant leak in an air conditioning system can significantly impact its cooling performance and efficiency. Refrigerant is a vital component of an ac system that absorbs heat from the indoor air and transfers it outside, enabling the cooling process.
When a leak occurs, the refrigerant level decreases, resulting in diminished cooling capacity and potential damage to the system.
Causes of Refrigerant Leaks:
- Refrigerant leaks can stem from various factors, including:
- Wear and tear of the refrigerant lines over time
- Poor installation or improper connections
- Physical damage to the refrigerant lines due to external factors
- Corrosion or deterioration of the coils or components
- Manufacturing defects or faulty components
- Lack of regular maintenance and inspections
Symptoms:
Detecting a refrigerant leak’s signs is crucial in promptly identifying and addressing the issue. Look out for the following symptoms:
- Reduced cooling capacity or inadequate cooling
- Longer cooling cycles
- Hissing sounds near the air conditioner
- Presence of oil stains or frost around the refrigerant lines or components
- Ice buildup on the evaporator coil
- Increased energy consumption
- Higher humidity levels indoors
Troubleshooting Steps:
Look for signs of refrigerant leakages, such as oil stains or frost:
Inspect the area around the air conditioning unit, particularly the refrigerant lines and components, for any signs of oil stains or frost buildup. These can indicate a refrigerant leak.
Inspect the refrigerant lines for visible damage or corrosion:
Carefully examine the refrigerant lines for any visible damage, such as cracks, punctures, or corrosion. Damaged or corroded lines are more prone to refrigerant leaks.
Listen for hissing sounds near the refrigerant lines:
When the refrigerant escapes from a leak, it often produces a hissing sound. Listen carefully to the refrigerant lines or components to detect any unusual sounds.
If a leak is suspected, contact a professional HVAC technician for repairs: Refrigerant leaks require the expertise of a trained HVAC technician.
If you suspect a refrigerant leak based on the symptoms and troubleshooting steps, you must contact a professional for a proper diagnosis and repair. They will have the necessary tools and knowledge to detect and fix the leak and recharge the refrigerant to the appropriate level.
Addressing a refrigerant leak promptly not only restores the cooling performance of your air conditioning system but also prevents further damage and potential harm to the environment.
Electrical Issues
Electrical issues can disrupt the operation of your air conditioning system and lead to malfunctions or complete failure of air conditioning coils.
These issues can arise from problems with the circuit breaker, wiring connections, or thermostat batteries. Addressing electrical problems promptly ensures your air conditioner’s safe and efficient functioning.
Causes of Electrical Issues:
Electrical issues in air conditioning systems can be caused by various factors, including:
- Tripped or blown fuses in the circuit breaker
- Loose or damaged wiring connections
- Faulty electrical components
- Inadequate power supply or voltage fluctuations
- Aging or deteriorating electrical systems
Symptoms:
Identifying the symptoms of electrical issues in your air conditioning unit can help you troubleshoot and resolve the problem. Look out for the following signs:
- Air conditioner is not turning on or operating intermittently
- Unresponsive control panel or thermostat
- Frequent tripping of circuit breakers
- Dimming or flickering lights when the air conditioner is running
- Burning smell or unusual noises coming from the unit
- Irregular or inconsistent cooling performance
Troubleshooting Steps:
Check the circuit breaker for a tripped or blown a fuse:
Locate the circuit breaker panel and check for any tripped switches or blown fuses. If you find a tripped switch, reset it by flipping it back to the “On” position. If you identify a blown fuse, replace it with a new one of the same rating.
Reset the circuit breaker or replace the blown fuse:
If the circuit breaker continues to trip or the fuse blows repeatedly, it indicates an underlying electrical issue. In such cases, it is advisable to consult a qualified electrician to inspect and address the problem.
Inspect the control panel for any loose or damaged wiring connections:
Carefully examine the control panel of your air conditioning unit. Check for loose or broken wiring connections. If you notice any issues, exercise caution and proceed to the next step.
Perform wiring repairs or contact an electrician if necessary:
If you have the knowledge and expertise, you can attempt to perform basic wiring repairs yourself.
However, if you are unsure or uncomfortable with electrical work, it is recommended to contact a licensed electrician to handle the repairs. They will ensure proper repairs and adherence to safety standards.
Check and replace the thermostat batteries if needed:
Many thermostats operate on batteries. Check the battery compartment of your thermostat and inspect the batteries.
If they are low or depleted, replace them with fresh batteries. This simple step can resolve some electrical issues related to thermostat functionality.
If you are uncertain or uncomfortable with any aspect of troubleshooting or repairs, it is best to seek the assistance of a qualified electrician or HVAC technician.
Key Takeaway
Regular maintenance helps to improve energy efficiency, extend the lifespan of your unit, and ensure consistent and reliable cooling performance. But how often do air conditioners need servicing?
While the frequency of servicing may vary depending on factors such as usage, environmental conditions, and manufacturer recommendations, it is generally advisable to have your air conditioner serviced at least once a year.
Some homeowners can perform some air conditioning troubleshooting steps, but there are instances when it is essential to seek professional help.
Professional HVAC technicians have the expertise, experience, and tools to diagnose and address air conditioning problems accurately and efficiently.
They can provide comprehensive repairs, ensure safety, and offer guidance on maintenance practices to maximise the lifespan and performance of your air conditioner.
Regular maintenance and prompt, professional assistance is vital to a comfortable and efficient cooling system. By staying proactive and addressing issues promptly, you can enjoy the benefits of a reliable and well-functioning air conditioning system for years to come.